Release news Naviate for Revit
Naviate Structure January Release 2024.3.1
Updates in Structure. Highlights include easier access to help and e-learning, dark theme, Configure Rebar Numbering, Export to Excel and more.
-
Update
-
Update
-
Feature
-
Feature
-
Fix
Easier access to help and e-learning
You can now use your Symetri account to access Naviate Help and E-learning in Pinnacle; less need for signing in.
First time you access Help or E-learning from any Naviate application you will be asked to login using your Symetri SSO credentials and to authorize Pinnacle to your Symetri account.
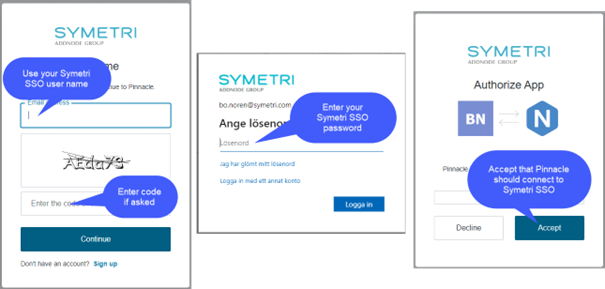
Now a Pinnacle account is created if you belong to a company with Naviate licenses. From now on your Pinnacle account will automatically be used every time you access Help or E-learning from any Naviate application if you have a Naviate license connected to your Symetri account.
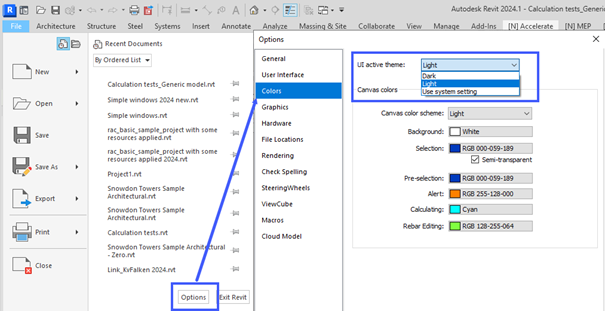
Dark Theme
Added Support for Revit Dark Theme to all Naviate products.
![]()
All Ribbons in Naviate applications now follow UI active theme setting in Revit. You can switch between active theme in Revit Options dialog box -> Colors.
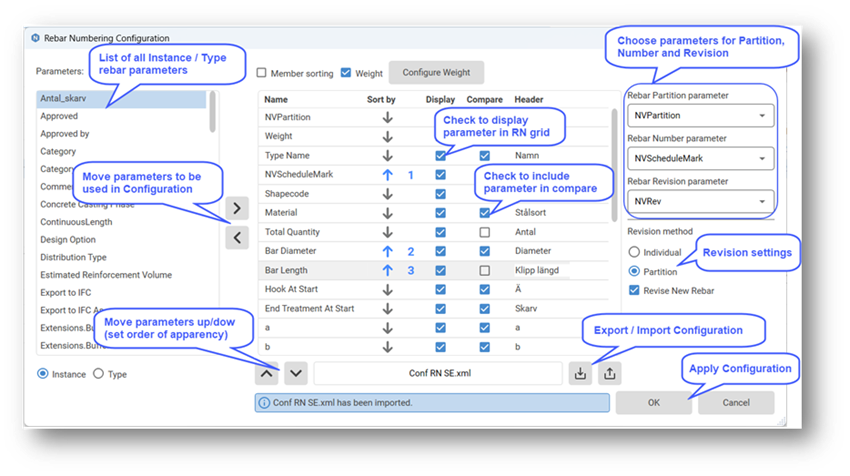
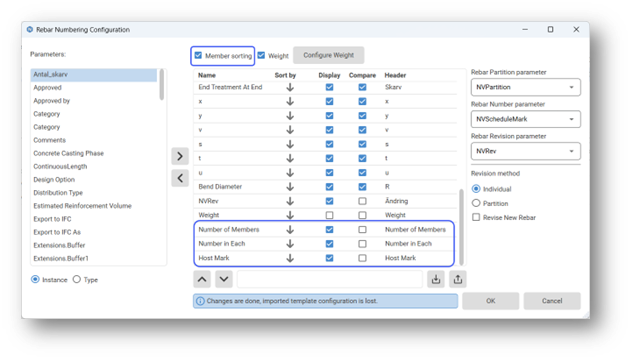
Configure Rebar Numbering
New feature for analyzing and numbering rebars where you can select and customize the parameters that will be used for analyzing, grouping/comparing, numbering, and revising reinforcement.
Now you can configure Rebar Numbering to the specific project requirements. Create your own configuration with the ability to export it in XML format and share it across different projects.
Choose from any instance or type parameters, customize their visibility in the data grid (Display) and choose parameters that will be used when running an analysis (Compare). For the selected parameters it is possible to set the Header, order of apparency in RN and sorting order (Sort by). The “Sort by” option allows you to select a maximum of three priority parameters in either Ascending or Descending order, which will determine how the rebar groups are sorted in the Rebar Numbering dialog.
In the configuration dialog, you can choose parameters for Partition, Number, and Revision. Also, you can choose between Individual or Partition revision methods, and decide whether to include the revision of new rebars.
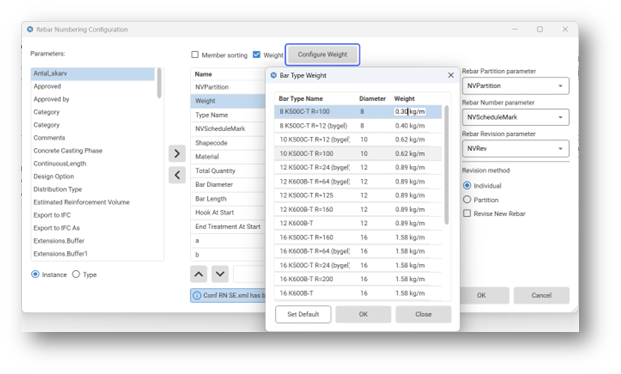
Check “Weight” option at the top of the configuration dialog and the Weight parameter will be created and added to the list. The weight is calculated based on unit weight, use Configure Weight to set unit weight for all bar types from the project:
If reinforcement in your project needs to be grouped and numbered by the Built-In parameter Host Mark, activate Member sorting, and needed parameters will be added to the list (Host Mark, Number of members and Number in each):
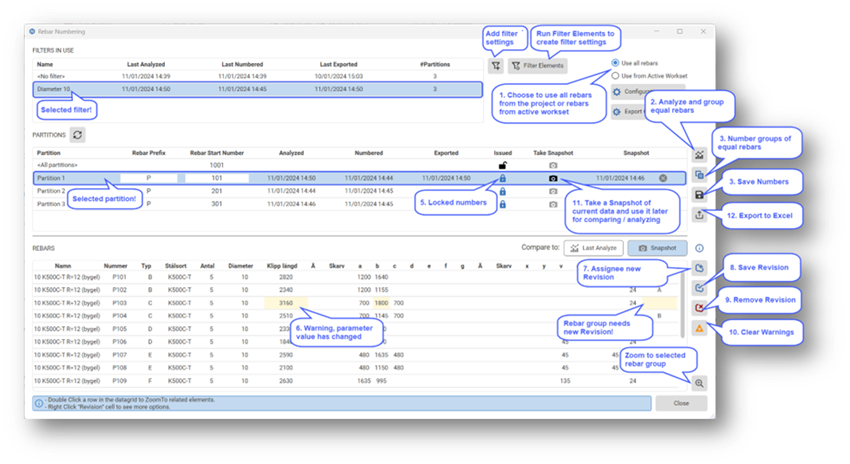
The main features of Configurable Rebar Numbering are
- Choose to analyze all rebars from the project, rebars from the active workset or rebars from the selected filter (Filter in Use). The partition list then shows all partitions related to your chosen selection.
- Analyze reinforcement of selected partition and group equal rebars. Detect the changes since the previous analysis.
- Number groups of equal rebars, enter prefixes and start numbers.
- Save assigned numbers on rebars.
- Lock numbers to keep existing numbers and not use already used numbers.
- Show changes/warnings on rebar parameter values.
- Define the next Revision on rebar groups. Use letters or numbers as revision marks.
- Apply/save Revision on rebar groups.
- Remove revisions on one rebar group or for all groups.
- Remove warnings on one rebar group or for all groups.
- Take a Snapshot of current data in Rebar Numbering and use it later for comparing and detecting changes. While the snapshot is active, you can analyze to compare changes from the Last Analyze or the last saved Snapshot.
- Export Excel report for selected partition(s) in Excel.
Configure Rebar Numbering - Export to Excel
Create Excel report (cut and bend list) from Conf. Rebar Numbering, choose a costumed export template and define user/project data that should be part of the report.
The main features of Configurable Rebar Numbering are
- Select the Excel template. Create your own Excel template to suit your project requirements. Use placeholders like {parameter name} linked with Rebar Numbering parameters.
- Choose the export path (save location), where the report will be saved.
- Add User Data, which can be document information such as the page numbers, creation date, name of the document ...for each partition in the project. To get user data in an Excel report use placeholders as for Rebar Numbering parameters.
- NOTE: The XML export is not implemented yet, but will be in the next version.
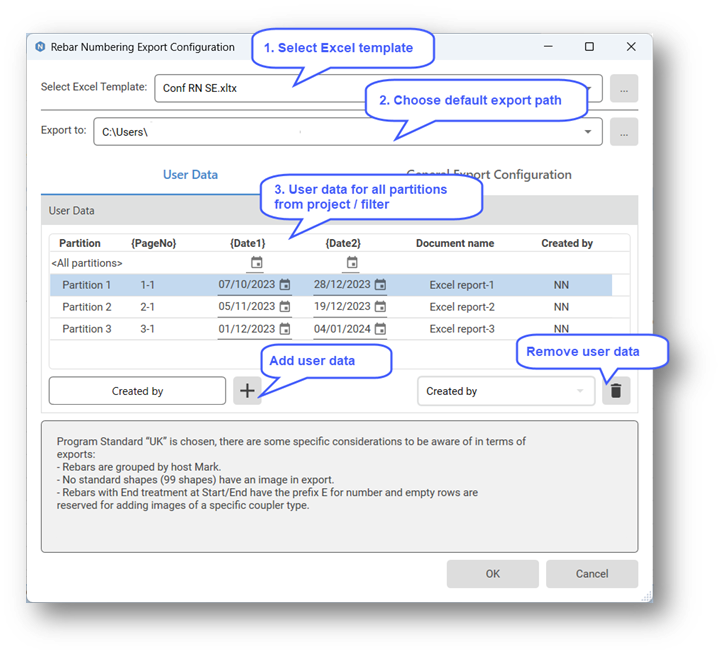
- In General Export Configuration choose to export rebar images. You can export images for all rebar shapes or only for specific (selected shapes):

Note: When the export Images option is active, Revit schedule “NVRebarScheduleImages“ is created and used for reading the Bending Detail information (dimensions and formatting options). To define where images should be placed in the Excel template use placeholders {NVBendingDetail}.
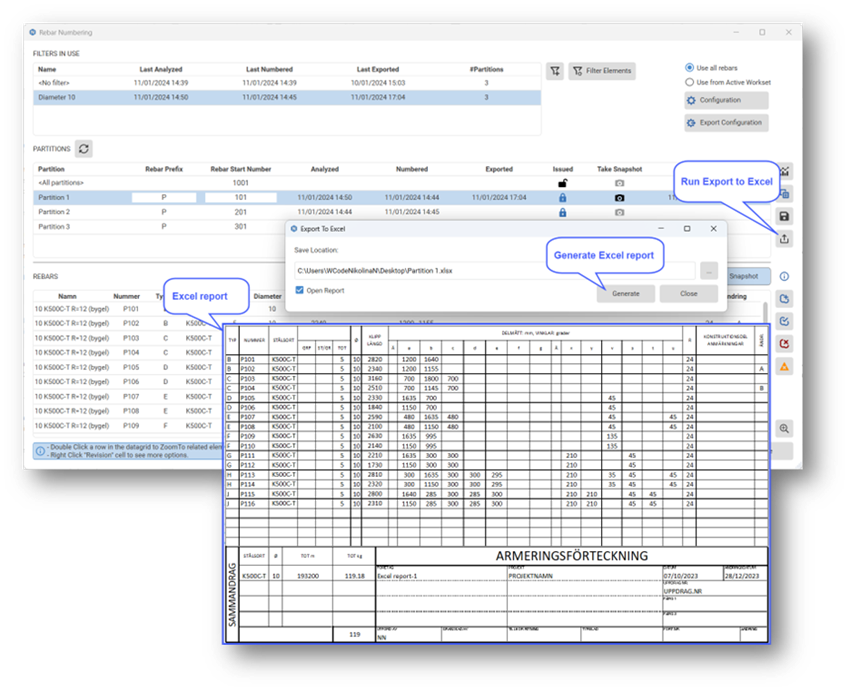
When you have set up the export configuration, run “Export to Excel” from the Rebar Numbering dialog and generate Excel report:
Fixes
- Update Symbols: Fixed the issue when updating existing symbols on reinforcement.