Release news Naviate for Revit
Naviate Site & Landscaping September Release 2025
Release news for Naviate Site & Landscaping. Highlights include new download from MySymetri and updated to Align Topo, Align and Fill, Align Profile and more.
-
Feature
-
Update
-
Update
-
Update
-
Update
-
Update
-
Update
-
Update
New! Download applications from MySymetri
Use my.symetri.com to download your Naviate applications. We have added a new tab to My Symetri to allow you to download software from Symetri.
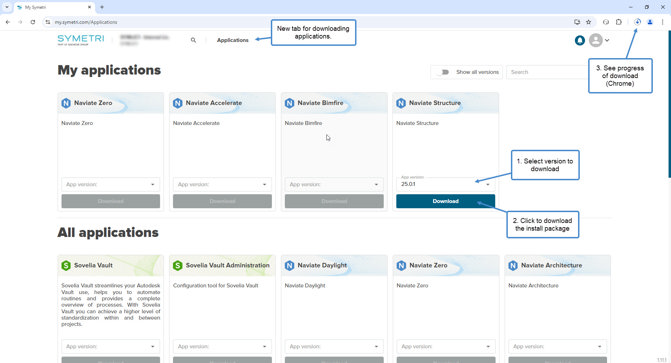
On top of the page, you see all applications that you’re assigned to. Further down you see all applications available for download.
Select the version you want to download and press Download. The download is managed by the browser you are using.
Note! Depending on the settings for your account you may see more tabs or not see the Application tab at all.
If you have manager rights for your company in My Symetri you can turn on and off the ability for regular users to download applications in the company settings for applications.
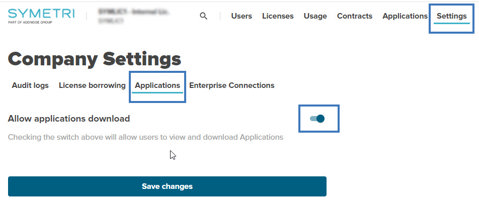
With this setting turned off regular users will not see the Applications tab.
Note! Only new versions will be available on the Applications page on my.symetri.com. Older versions can be downloaded from naviate.com/downloads/ as before.
Check for updates
Get notified if there are newer versions available for download. When Naviate 2025 is started there is a check if there are newer versions available of your installed applications.
All available updates are shown in a dialog box:

Click on Go to My Symetri to go to my.symetri.com to download the available updates. You can postpone the check if you don’t want to download and install the new versions. The available options are:
- until next startup – Remind me next time Revit/Naviate is started (default).
- 1 day – Remind me when starting Revit/Naviate next day.
- 1 week - Remind me when starting Revit/Naviate next week.
- 1 month - Remind me when starting Revit/Naviate next month.
- until next version – Don’t remind me until a newer version has been released.
If no updates are available or if you have postponed the check for updates no message is displayed when starting Naviate.
It is possible to turn off the notification for new updates when doing a scripted installation of the application as in earlier versions. This is done by using the parameter UPDATEMODE=0.
Separate install for Naviate Accelerate
Download and install Accelerate separately; no longer automatically installed by A, E, FAB, H, L, MEP, S or SL applications.
You need to download and install Naviate Accelerate as a separate application. You also need to update it separately if there is a newer version available.
Applications installed in separate sub-folders
Each application is installed separately and run more independently to avoid problems of using different versions together.
We still recommend that you install the latest version of all your Naviate applications but with this change it is less risk that you will have any problems using different versions of your Naviate applications.
The Install UI for all application has some changes. It is now easier to select the wanted country setting for Naviate tools.

The selected Country/Region is used by Naviate tools. Some tools use selected country as default setting and some tools that are developed for a certain country will only be visible for that country.
Country/Region setting can be changed after installation using Naviate Settings in the About pulldown menu. All applications are using the same selected country; if you change for one application it affects all.
When installing a second Naviate 2025 application the previously selected country/region is selected as default in the dialog box, but you can change to use another one.
Help tools included in each application
Help is no longer in a separate application; the tools are included in each application.

Updated Symetri login
Additional methods for login in if login window is not automatically shown.
The login page should automatically appear in the default browser. If you don’t get the login page you can now choose to try to open the browser or use a mobile device to login.
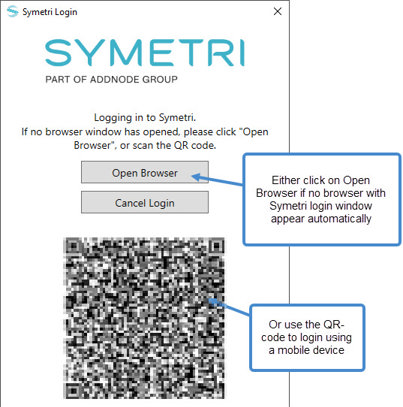
If you have rights to manage licenses on My Symetri there is now an option to create a license file including Single user licenses that you can copy to machine not connected to internet.
Improved performance with less dependencies on external services and a new method for off-line activation.
We have removed the dependency on an external service that caused problems with the licensing. With this change we also introduce a new method for managing licenses on computers that are not connected to internet.
The process to create licenses for offline use has changed. You can now generate license files and copy to computers with no or limited access to internet. You can use the Symetri License Toolbox application to help generate and deploy the offline license or manually generate a license file from My Symetri and copy it to the correct location.
The Symetri License Toolbox can be downloaded from My Symetri if you have access to Applications.
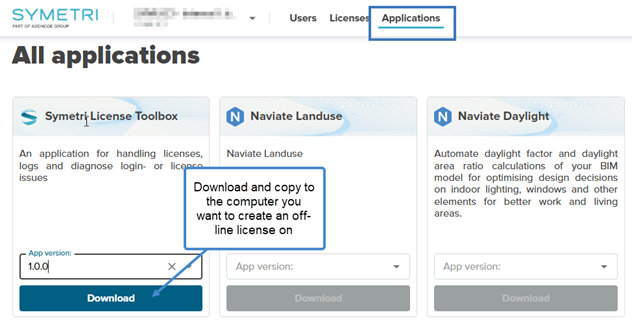
Copy the downloaded application to the computer that should have the offline license and start it.
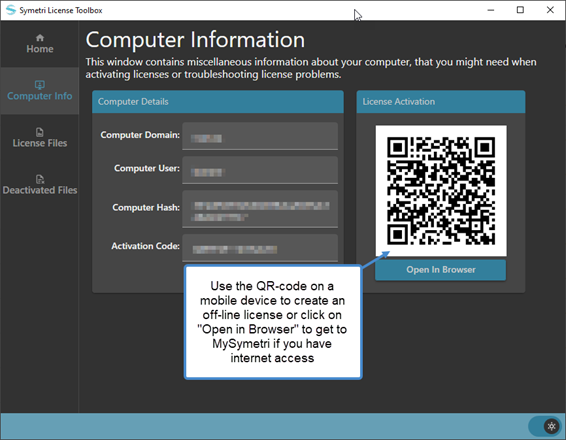
Goto Computer Info tab. Scan the QR-code by using the camera on a mobile device if the computer isn’t connected to internet or click on “Open in Browser” to generate a license file for the Domain & User shown in the dialog box. This will direct you to the Generate license file tool in My Symetri.
Instead of using the License Toolbox application you can click on Generate License file in My Symetri if you have rights to manage licenses. This will get you to the same dialog box as the License Toolbox, but you need to manually enter Domain and Username that should be used for the offline license.
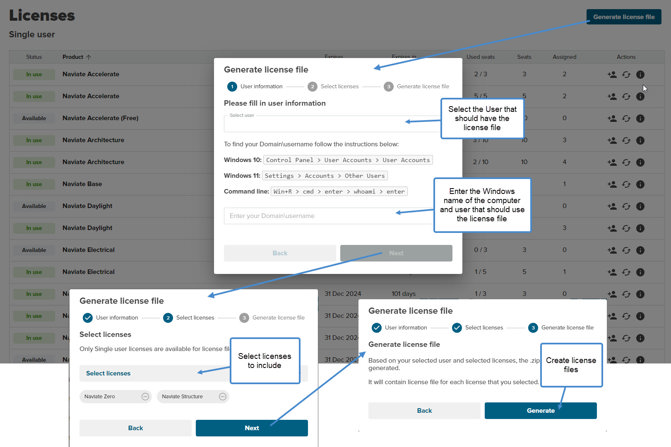
NOTE! Use capital letters when entering the Domain name.
Select which licenses that you want to generate licenses files for and click on Generate on the last page. A zip-file containing the licenses files is generated and downloaded by the browser. Copy the .zip file to the offline computer.
If you are using the Symetri License Toolbox application, you can go to License Files tab and click on Add New License File. Choose to see .zip files and select the downloaded license file.
If you don’t use the License Toolbox you can manually extract the included license files from the downloaded .zip file and copy them to the %appdata% \Symetri\Licensing \Cache folder on the machine you want to use off-line when you are logged in as the user specified when creating the license file.
Align Topo, Cut and Fill, Align Profile
Align Topo
Optimized performance by placing Split Lines along straight segments.
Optimization in Align Topo:
- Instead of placing points using Point Interval values, Split Lines will be placed along straight segments and angled straight segments.
- For straight segments, the Point Interval will be ignored when placing points.
- For round and curved segments, the current placement method will be used, where Split Lines are not placed, and points are positioned based on the Point Interval values.

Cut and Fill
Optimized performance by placing Split Lines along straight segments.
Optimization in Cut & Fill:
- Instead of placing points using Point Interval values, Split Lines will be placed along straight segments and angled straight segments.
- For straight segments, the Point Interval will be ignored when placing points.
- For round and curved segments, Split Lines will be placed between points, using the Point Interval for point placement.
- Slope Marking boundary lines will also use Split Lines to connect points.
- “Line & Elevation” option will use old placement method (Split Lines will not be placed, and points will be positioned based on the Point Interval values).

Align Profile
Optimized performance by placing Split Lines along straight segments.
Optimization in Align Profile:
- Instead of placing points using Point Interval values, Split Lines will be placed along straight segments and angled straight segments.
- For straight segments, the Point Interval will be ignored when placing points.
- For round and curved segments, Split Lines will be placed between points, using the Point Interval for point placement.
- Slope Marking boundary lines will also use Split Lines to connect points.
- Using the “Profile Curved Radius” option in the tool will curve a straight line along the Z axis. In this case, the Point Interval values will be used, and Split Lines will be placed between the points.


