Release news Naviate for Revit
Naviate Electrical October release news 2025
Release news for Naviate Electrical. Release includes Import XML from Nettdok, Quick Create 1-Line and 1-Line Schedule Data Sync and Circuit Numbering Settings sync improvements in addition to common improvements and fixes.
-
Update
-
Update
-
Update
-
Update
-
Update
-
Update
-
Fix
Import XML from Nettdok
This is a new feature that expands on the current Naviate-Nettdok integration by mapping Electrical Power System data to Revit Model Elements, imported from Nettdok-generated XML export files.
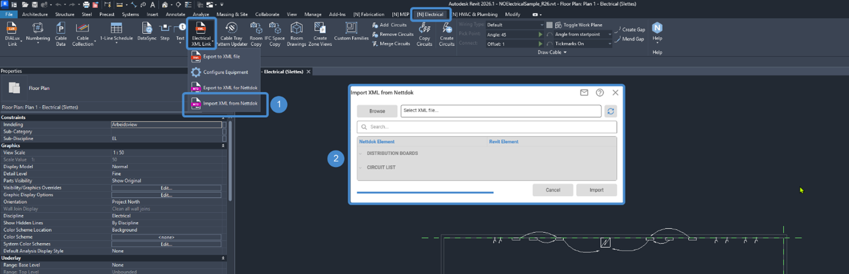

Figure 1: The Import XML from Nettdok dialog.
The main workflow is as follows:
1 Click Import XML from Nettdok.
2 The Import XML from Nettdok dialog opens.
3 Click the Browse button to open a File Explorer window and choose the .xml file generated by Nettdok.
4 Once a file is selected, the file path will be displayed.
5 The Refresh button will reload the .xml information from the file at the displayed path. Use the Refresh button if the .xml file was overwritten with new data and the table Nettdok-Revit Element mapping dialog will update.
6 The search bar function will iterate over the project’s Electrical Equipment and Circuits for their parameter values, searching in a ‘contains’ manner.
7 The DISTRIBUTION BOARDS header can be collapsed and expanded by clicking the caret (^) symbol. Elements grouped into DISTRIBUTION BOARDS include all Elements from the Nettdok file contained in the <ObjectList> tag. Each Element is then sorted/listed by the value contained in the <sRefSystem> tag. Available parameters that can by synced/mapped with the associated “Electrical Equipment” Revit Element (in the same row to the right) include:
- 7a System
- 7b Voltage – a read-only parameter
- 7c Phases – a read-only parameter
8 The CIRCUITS header can be collapsed and expanded by clicking the caret (^) symbol. Elements grouped into CIRCUITS include all Elements from the Nettdok file contained in the <CircuitList> tag. Each Element is then sorted/listed by the value contained in the <sCircuitNbr> tag. Available parameters that can by synced/mapped with the associated “Circuit” Revit Element (in the same row to the right) include:
- 8a Schedule Circuit Notes
- 8b NVFaser
- 8c NVVernType
- 8d Rating
- 8e NVUtloserkurve
- 8f Number of Poles
- 8g Wire Type
- 8h Load Name

Figure 2: The Import XML from Nettdok dialog, showing Circuit parameters as well as status indicators.
Referencing the image Figure 2 above, as each Nettdok Element is mapped to a Revit Element (9), a status indicator (10) will convey if the Nettdok Element is properly mapped.
 - indicates a successful mapping
 - indicates mapping is incomplete
The Import button will not be available until all rows of Elements are mapped successfully. Progress of this mapping can be tracked with the progress bar (11).
Once the Importing is complete, the property values in Main Workflow Step (7) and (8) will be synced for the Revit Elements in the Category Electrical Equipment and Electrical Circuits.
Quick Create 1-Line and 1-Line Schedule Data Sync
Improved stability of Quick Create 1-Line Schedule and 1-Line Schedule Data Sync tools. The improvements for this ‘1-Line’ workflow can be summarized as follows:
Improvements to the syncing of relationships between Drafting View and Switchboard
Various fixes and improvements have been made to the 1-Line Schedule workflow, resulting in a more reliable experience. In order to create a successful sync relationship, a typical workflow is as follows:
1 Under [N] Electrical > 1-Line Schedule > Quick Create 1-Line Schedule, create a Drafting View by:
- 1a Typing the Drafting View’s name in the top dropdown
- 1b Selecting the desired One Line Switchboard Settings. This will include entering Default Parameter Values for the listed Parameters on the right-hand side of the dialog and selecting Detail Item RFA’s for the following elements:
- i. Powerbar
- ii. Breaker
- iii. Equipment
- iv. Terminal
- 1c Note: In One Line Switchboard Settings, the Default Parameter Values will appear in the Drafting views when the associated Tag RFA is selected in items 1.b.i-iv. In this latest Naviate (2023-2025), parameter NV_Wire Type will appear in the Drafting View as populated in One Line Switchboard Settings.
- 1d Note: NV_Wire Size no longer appears as a Default Parameter Value in 2023, 2024 and 2025 versions in One Line Switchboard Settings Menu. However, when the user creates a Drafting View, that parameter is available in Properites Palette of Drafting View’s Detail Items. Upon creation, it will be populated by a default value, and the user can change that value by selecting a Detail Item and changing it in Properties, or by clicking on WireTypeSizeTag.


- 1e In 2026 version NV_Wire Type and NV_Wire Size Parameters have been replaced by NV_Cable Type and NV_Cable Size to correlate to Revit’s changes. These parameters are available in One Line Schedule Settings Menu and will be shown when Drafting View is created. Note: if the user wants to use an older model, created in 23-25, make sure to follow these steps:
- i. Open the model in 26, run Quick Create 1-Line Schedule tool
- ii. Open One Line Switchboard Settings
- iii. If WireTypeSizeTag was chosen for one of Default Detail Items, it will now be shown as Blank in the Dropdown
- iv. Change this tag to CableTypeSizeTag – NV_Cable Type and NV_Cable Size values will populate this tag once a new Drafting View has been created

- 1f Note: NV_Wire Type and NV_Wire Size can be displayed on a Drafting View if a “NV_OneLinePlus_DetailTag: WireTypeSizeTag” is chosen in 23-25 One Line Schedule Settings. In 2026, NV_Cable Type and NV_Cable Size will be shown if “NV_OneLinePlus_DetailTag: CableTypeSizeTag” is chosen.
2 Once the Drafting View is created, click [N] Electrical > 1-Line Schedule DataSync
- 2a Select a Drafting View from the list to sync to a Switchboard Family Instance. There are two options for how the sync is completed:
- i. Keep Switchboard parameter values
- ii. Keep Drafting View parameter values
- 2b Click OK
- 2c Click a Switchboard Family Instance in the Revit Drawing Window
- 2d Relationship is then created, with a notification message to the user

Circuit Numbering Settings sync improvements
Sequences created within Circuit Numbering Settings correctly apply to new Drafting Views created by Quick Create 1-Line as well as existing relationships that are Synced by One-Line DataSync.
Once a Sequence is defined in the Circuit Numbering Settings dialog, that circuit numbering sequence is saved to the Revit model. This sequence can then later be reflected in the following workflows:
1 In Quick Create 1-Line Schedule, create a new Drafting View by typing a new Switchboard View Name.
- 1a As Circuits are added to the Drafting View, the Circuit Numbering will reflect the Circuit Numbering Setting sequence.
- 1b Note: Existing Drafting Views will maintain their Circuit Numbering sequence as originally generated, unless the Circuit Numbering command is executed.
2 For existing Drafting Views (created by Quick Create 1-Line Schedule), in order to reflect Circuit Numbering sequences:
- 2a Ensure that a One-Line DataSync relationship is successfully created between the Drafting View and a Switchboard Family Instance.
- 2b Run Circuit Numbering Settings on a Switchboard, enter values and then run Circuit Numbering command.

- 2c After executing the Circuit Numbering command, Circuits that are in a One-Line DataSync relationship will now reflect the Circuit Numbering sequence. Note: After changing Circuit Numbering sequence and running Circuit Numbering on previously synced Switchboards, their Drafting View could lose the sync relationship (changes in parameter values not being transmitted between the Switchboard and Drafting View). Solution to this is to run 1-Line Schedule Data Sync Tool again on those Switchboard – Drafting View combinations.
Licensing - Login
Login after start of Revit or after you have logged out.
You no longer must restart Revit to login again. We have added a Login option in Help ribbon to allow you to login after you started Revit/Naviate or after you have logged out from Naviate.
If you skipped login at startup, or was off-line, you might have to click on Release and Refresh tool (see below) to obtain a license after you have logged in.
Note! You cannot logout and login with another account; you can only login using same email address that was used at startup of Revit/Naviate.
Refer to the following link that summarizes the licensing updates that are now applied to the 2025 version of Naviate. https://naviate.com/release-news/naviate-for-revit-2023-and-2024-license-update/
Licensing - Release and Refresh
Release licenses or get access to Naviate without restarting Revit after long inactivity.
We have added a new tool in Help ribbon to release licenses and re-activate your licenses after a long period of inactivity. You no longer must restart Revit/Naviate after a long period of inactivity or sleep mode.
When clicking on Release and Refresh, any used license will be returned, and licensing system is re-initialized. You will be asked to login if needed.
Refer to the following link that summarizes the licensing updates that are now applied to the 2025 version of Naviate. https://naviate.com/release-news/naviate-for-revit-2023-and-2024-license-update/
About - User name
Logged in user email address is moved from the main ribbon to About drop-down to save space in the ribbon.
Fixes
- Edit 1-Line Schedule
- Resolved an issue with the command not populating correct values from 1-Line Schedule Settings.
- 1-Line Schedule Data Sync
- Resolved an issue when syncing with a non-Power Panel
- Data Sync
- Resolved an issue with command not working with Filled Regions.